Palo Alto Networks · Firewalls
Configuring a DHCP WAN Interface
PAN-OS 11.1 · Ethernet Interface · ISP DHCP · CLI & GUI
🔍 Overview
By configuring the WAN interface to communicate with your ISP via DHCP, the firewall can automatically receive its public IP address, default gateway, and DNS information.
I originally set out to stop paying for static IP addresses at my house because they were expensive and, in my case, completely unnecessary. When I first made the switch, it was surprisingly tricky. I will blame my ISP here and not any naivety on my part.
In my environment, I also have a VPN portal that my family uses regularly to access my server. Because of that, I set up a Raspberry Pi to handle Dynamic DNS updates with my domain provider every five minutes. That way, if my public IP address changes, I can still reliably reach my VPN portal without having to play "guess the new IP address," while keeping downtime to an acceptable minimum.
✅ Prerequisites
- Know the limitations of your ISP. Will they distribute more than one public IP address? Do you need to contact them because your MAC address will change when switching out their equipment?
- Know which interface is your WAN port (e.g.
ethernet1/8) - Interface must be assigned to a zone, typically untrust (I use
WAN) - Local admin access to the firewall (GUI or SSH)
- PAN-OS 11.1 or later (steps are similar across versions but also painfully different)
⚙️ Configuration
Step 1 — Assign the interface to a Virtual Router and Zone
Navigate to Network → Interfaces → Ethernet
Click on your WAN interface (e.g. ethernet1/8)
Set Interface Type to Layer3
Under the Config tab, assign Virtual Router to default and Security Zone to your WAN zone (e.g. WAN or untrust)
Click OK
set network interface ethernet ethernet1/8 layer3 ip dhcp-client enable yes
set zone WAN network layer3 ethernet1/8
set network virtual-router default interface ethernet1/8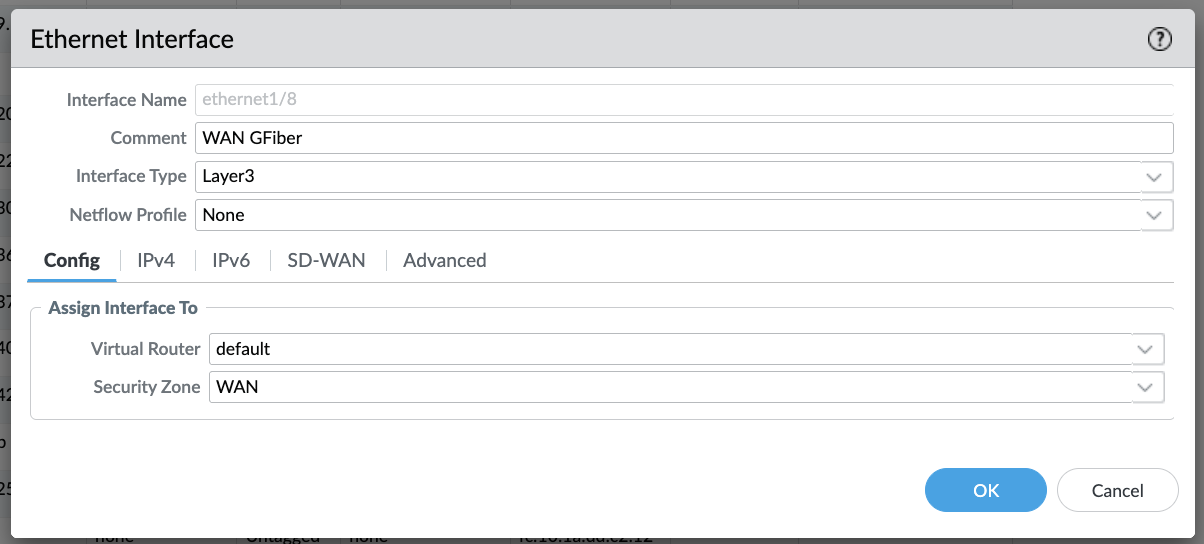
Network → Interfaces → Ethernet → Config tab — assign Virtual Router and Zone
Step 2 — Configure the interface as a DHCP client
On the interface config page, click the IPv4 tab
Set Type to DHCP Client
Check Automatically create default route pointing to default gateway provided by server
Optionally set a Default Route Metric (useful for dual-WAN setups)
Click OK then Commit
set network interface ethernet ethernet1/8 layer3 dhcp-client enable yes
set network interface ethernet ethernet1/8 layer3 dhcp-client create-default-route yes
set network interface ethernet ethernet1/8 layer3 dhcp-client default-route-metric 10
commitdefault-route-metric is optional. Lower value = higher priority. Useful if you have two WAN links.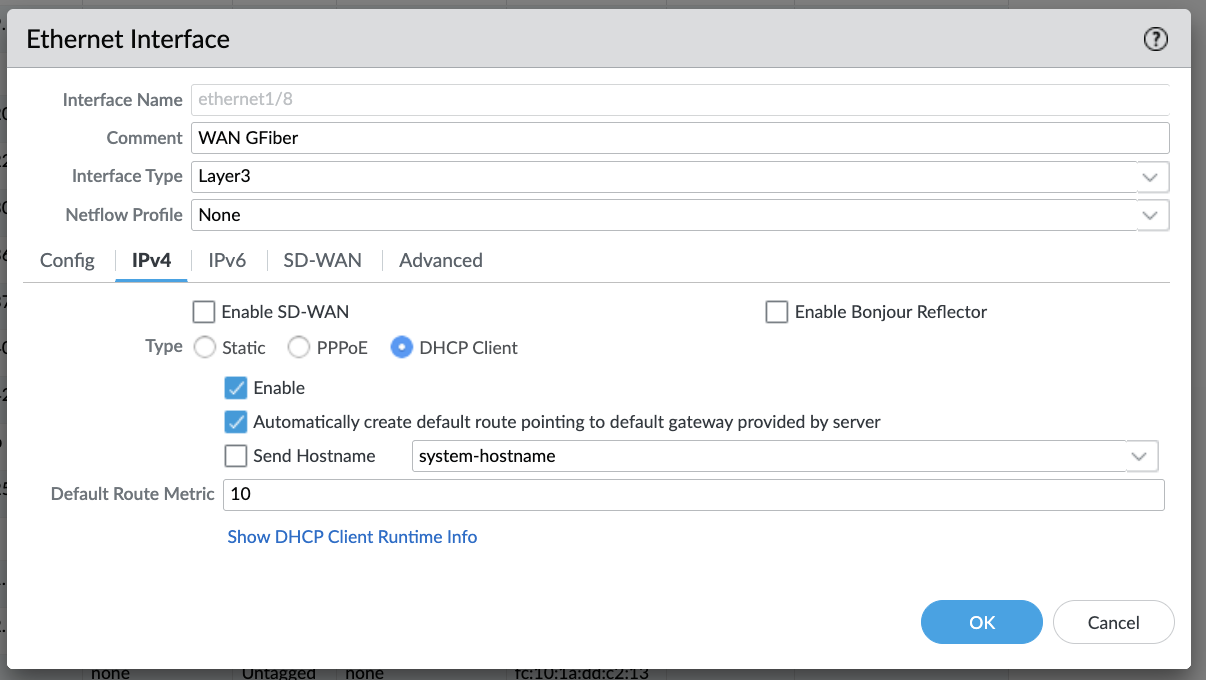
Interface IPv4 tab — set Type to DHCP Client and enable default route creation
📊 Verification
After committing, verify the firewall received a DHCP lease from the ISP.
Check DHCP client status
Navigate to Network → Interfaces → Ethernet
Click on Dynamic DHCP Client on your interface (e.g. ethernet1/8)
The state should show Bound with an IP address, Gateway, Primary DNS, and Secondary DNS servers populated
# Check DHCP lease info
show dhcp client state interface ethernet1/8

# Check interface IP
show interface ethernet1/8

# Check routing table for default route
show routing route type unicast destination 0.0.0.0/0

# Ping the ISP gateway
ping source ethernet1/8 host <gateway-ip>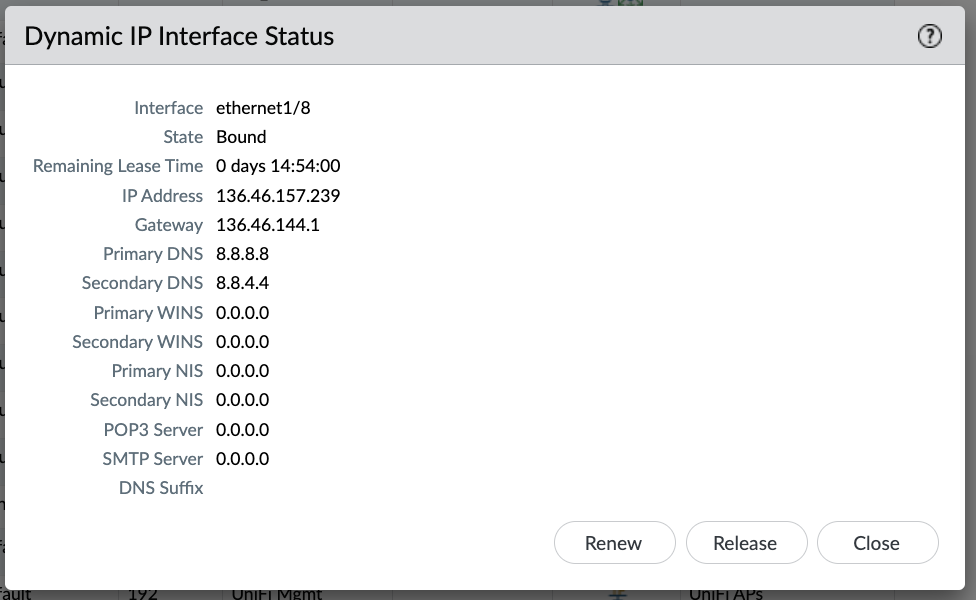
Network → Interfaces → Ethernet → Dynamic DHCP Client — showing Bound state
Expected output
> show interface ethernet1/8
--------------------------------------------------------------------------------
Name: ethernet1/8, ID: 23
Link status:
  Runtime link speed/duplex/state: 1000/full/up
  Configured link speed/duplex/state: auto/auto/auto
MAC address:
  Port MAC address <MAC address omitted>
Interface Type : Port Type: RJ45
Capability : auto, 10Mb/s-half, 10Mb/s-full, 100Mb/s-half, 100Mb/s-full, 1Gb/s-full
Operation mode: layer3
Untagged sub-interface support: no
--------------------------------------------------------------------------------
Name: ethernet1/8, ID: 23
Operation mode: layer3
Virtual router default
Interface MTU 1500
Interface IP address (dynamic): <IP Address Omitted>
Interface management profile: N/A
Service configured: SSL-VPN
Zone: WAN, virtual system: vsys1
🔧 Troubleshooting
No IP address assigned
- Check physical link —
show interface ethernet1/8should show up/up - Verify the ISP modem/ONT is online and passing DHCP
- Try releasing and renewing the lease
request dhcp client renew interface ethernet1/8IP assigned but no internet
- Confirm default route was created:
show routing route
> show routing route

flags: A:active, ?:loose, C:connect, H:host, S:static, ~:internal, R:rip, O:ospf, B:bgp,
       Oi:ospf intra-area, Oo:ospf inter-area, O1:ospf ext-type-1, O2:ospf ext-type-2, E:ecmp, M:multicast

VIRTUAL ROUTER: default (id 1)
  ==========
destination          nexthop                  metric flags   age   interface
0.0.0.0/0 <IP Address Omitted> 10 A S ethernet1/8- Check NAT policy — outbound traffic from trust to untrust needs a source NAT rule
- Check security policy — verify traffic is allowed from trust to WAN (or untrust)
# Ping from dataplane
ping source <dhcp-assigned-ip> host 8.8.8.8

# Check NAT policy hits
show running nat-policy
DHCP lease keeps dropping
- Check for link flapping:
show interface ethernet1/8— look at input/output errors - Check ISP modem logs for disconnects
- Verify no duplicate MAC address on the ISP network
show counter interface ethernet1/8
show log system direction equal forward | match dhcpNo notes yet — click Edit Notes to add your own observations.